A Solid Shooting Bench
9/28/2011
For as long as I can remember I've thought it would be great to have my own shooting bench and the property to set it up on. I own a portable bench that I have used for prairie dog hunting and even used it at my brothers farm to sight in rifles. I got tired of toting it back and forth so I built a wooden bench at the farm and used it a few times. It sits in the weeds now and nobody uses it.
In the summer of 2010 we moved to a house on 10 acres and in September of 2011 the new shooting bench was poured. I know nothing about pouring concrete but got the chance to buy a used electric mixer and did so knowing I wanted a concrete bench and have other plans for the mixer as well.
A friend/customer of mine, Greg, offered to build the frame for the bench and to help me get it poured. He has experience with concrete so it would be more like me helping him.
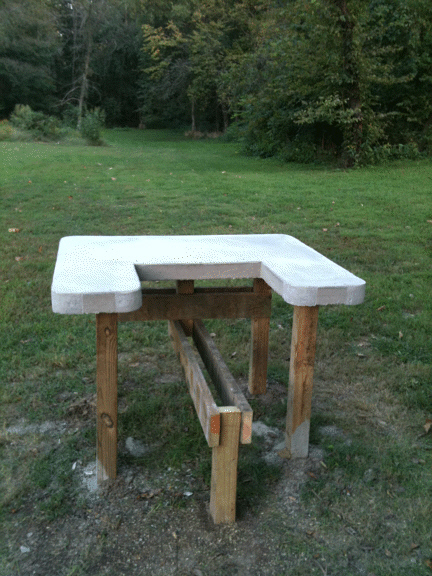
After measuring out 100 yards and testing, the actual location of the bench was decided. That was the easy part. I decided on a bench style just based on my own experience. I hate running out of room to set stuff when I'm shooting so I wanted a big bench. I don't shoot left handed but may need to someday or may have a friend that does, so I decided on a U-shaped bench that will accommodate lefties and righties.
I did quite a bit of research on the size and height the bench should be and came up with dimensions for Greg to shoot for, pun intended.
He delivered the frame to my shop in a few days and handed me a card with the number and size of the pieces of re-bar that I needed to prepare. The frame was made with 2x4's screwed to a couple of pieces of 3/4" plywood. The plan was to pour the bench on top of the posts so that we did not have to lift it into place later. So with the frame laying in the bed of my truck I took a chunk of 4x4 post and traced around it at all 4 corners of the bench. Took my trusty jig saw and made some holes.
I guess there was more than one approach to use here but my coarse of action was to lay the frame on the ground in the desired location and simply spray paint through the holes to mark the location the posts should be in. Having done that I fired up the post hole auger and drilled 5 holes in the ground. The 5th hole was centered approximately where I thought I would want my seat. I really had no clue how I was going to get a seat into position but figured having a post hole in the proximity would be a good idea.
With the frame back on the ground over the new holes, I dropped the posts through the frame and into the ground. Then simply lifted the frame up a couple of feet and screwed blocks to the posts for the frame to rest on. I plumbed the posts and dumped in dry concrete mix. Tamped that into place and within a couple of days it was feeling pretty permanent.
Sliding the frame up the posts to the desired height and blocking it into place with 2x4's running between posts, it was starting to look something like a shooting bench. I marked the posts at a height so that they were about 1 inch into the frame and cut off the excess.
The frame had square corners and I decided that running into one of those corners while mowing or riding the ATV would not be a pleasant experience. After some discussion I came up with the idea to use a roll of flashing that I had come up with some where along the way. That was a simple process of cutting enough pieces the right length, marking a set distance back from each corner and screwing the flashing in place with sheet rock screws. It looked a little crude but worked out great.
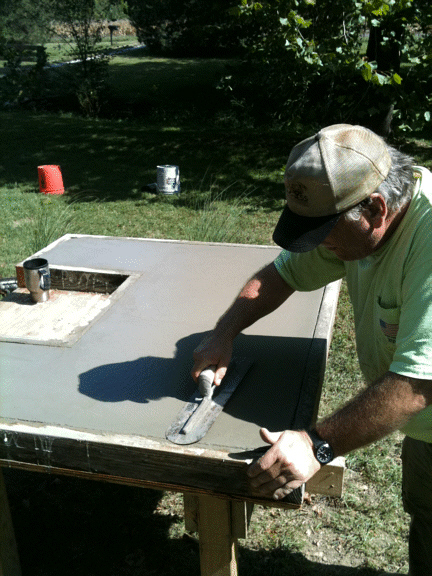
The pour date was set and the night before, I went and bought 8 80lb bags of concrete. I waited until the night before because I had no desire to move them at all let alone more than once. I bought and loaded them onto my utility trailer. The next morning I loaded my generator and the cement mixer onto the trailer and headed to the pour site. While I can see the bench from my front door, I don't have enough extension cords to reach that far. So the generator had come in pretty handy along the way.
Greg showed up with a mountain of concrete tools and stuff and we fired up the mixer. 6 bags later the frame was full and Greg was doing his thing to make it look good. I had a last minute brain fart and put a 243 case head into the surface. It was challenging for Greg to keep it in position but he humored me and got it done. I figured it was not as cliche as scratching a date into the surface somewhere and when they bust the bench up when I'm dead and gone, they'll know that "a 243 fan was here."
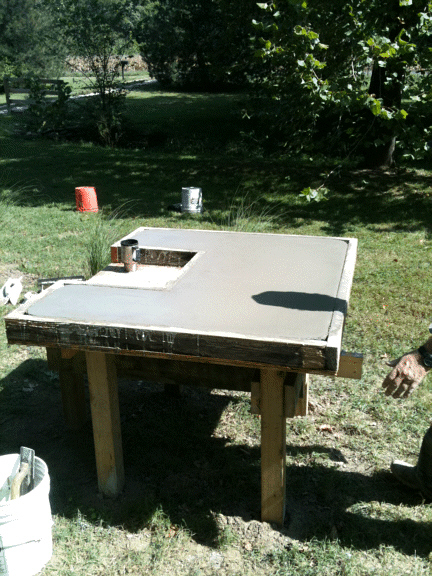
When it came time to remove the frame I simply un-screwed my 2x4 stringers under the bench and forced the frame down. Then I took apart the frame itself and cut the plywood off with a chainsaw.
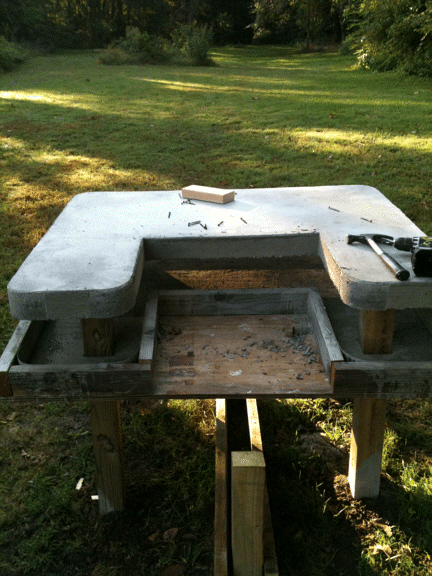
I haven't taken the time or had the time for that matter, to design a seat that will work for everyone including my granddaughters. The seat height right now with a slab of 2x6 laying on top of it works great. I am planning to come up with a way to make the actual seat slide as well as swivel. Then it will also either have to be changed out for a taller one or built where it can be raised for younger shooters.
There has probably been a couple hundred rounds fired from the bench so far and it's awesome.

Last Modified: Wednesday, September 28, 2011 10:22 PM